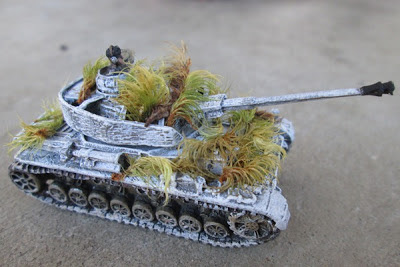
Happy Halloween everyone! I give you the dreaded Süßtiger (Sweet Tiger).
Translate
Wednesday, October 31, 2012
Friday, October 26, 2012
Experiments in Painting Camouflage, Part I
Painting camouflage is, quite honestly, one of the things that frighten me about doing WWII miniatures. Especially for German armor. So before I begin painting up any more Panzers, Panthers and Tigers (oh my!) I thought I'd conduct some experiments and get a bit of practice in.
Using the leftover side skirts from my first Panzer IV H, I set to work. The first was painted in that famous German tri-color camouflage pattern.
This was an interesting experience overall, and I really like the way the side skirts came out. I've also read that applying salt instead of toothpaste works too, so I think I'm going to experiment with that method next time.
Using the leftover side skirts from my first Panzer IV H, I set to work. The first was painted in that famous German tri-color camouflage pattern.
Using Dunkelgelb as the base color, I applied thin lines of red and green. As I progressed from left to right with the red, however, I found that drybrushing gave it the appropriate "feathered" look that the real tanks had. So I did this with the green too and was quite pleased with the results.
I then experimented with winterizing the camouflage. I applied masking tape over one side to keep it free from spray paint (I wanted to use the camo as a reference for the future, you see). On the uncovered side I dabbed on a little bit of toothpaste with a torn cosmetic sponge. After that was done, I gave it as light a spray of Testor's Flat White paint that I could. I ended up waiting less than 10 minutes for it to dry and took the skirt inside and gently began washing the toothpaste off. You can see the end result above, which I think was quite successful.
I repeated this whole process with the remaining side skirt. To keep it interesting I used classic Dunkelgrau, or dark grey. I quite like how this turned out too. So much so that I think I'm going to go with this look for my Marder II's when they arrive.
This was an interesting experience overall, and I really like the way the side skirts came out. I've also read that applying salt instead of toothpaste works too, so I think I'm going to experiment with that method next time.
First Panzer IV Ausf. H
My friend Ben recently introduced me to a new game called Flames of War. It's a 15mm WWII game which, it turns out, is a lot of fun to play! After lending (and leasing) me his British tank force for our first few games, I decided that I needed to start building my own army to play against the Weasel.
I settled on an Ardennes-style German force. I've always loved the look of tanks in the winter, and so here it is - my first Panzer IV Ausf. H!
Underneath that white camouflage is German Dunkelgelb, or dark yellow. I realize that the foliage is a bit off for the Battle of the Bulge. Not only is the grass too long, but it's also too yellow (it was a much darker green when I applied it to the model, but I think the sealer is making it dry out faster). I'm in the process of replacing it; the Flames of War website offers a nice tutorial. So I figure I'll end up doing something very similar.
Here's a close-up of the tank commander. I'm really pleased with how he turned out! I'd never painted a 15mm figure before and think he came out pretty well. If you look closely you can see a red dot on his cockade - a detail that I'm particularly proud of.
I didn't attach the side skirts because, based on a lot of the photos I've looked at, the Germans tended to take them off in the winter months. You can also see where I tried to put snow and mud in the tracks. I think they still look a little too clean, so I'm going to go back and dirty them up a bit more using Games Workshop's new texture paints.
Overall, I think this tank turned out pretty well for a first time. The kit was easy to assemble and a joy to paint. I'll definitely be building a few more of these, so stay tuned for more German armor goodness!
Subscribe to:
Comments (Atom)


